Best Ways to Fix Headphone Jack Not Recognized in Windows 11: Many people have reported problems with the headphone jack not recognizing their headsets in Windows 11. Because the computer does not identify their headphones, they cannot use them. However, people with this issue report that they tried these headsets on several computers, and they functioned well, indicating that the headphone jack is not the issue. This problem is most often seen with Windows 11.
Causes of Headphone Jack Not Recognized Issue
After receiving several reports about this error, we conducted a thorough investigation to determine what was causing this problem. Here’s a short description of all the possible causes of Headphone Jack Not Recognized Error;
1. Windows 11 connection problem
If you’re starting the investigation, restart your computer while plugging in the faulty headset. A common bug in Windows 11 causes occasional disruptions and connection issues with previously attached headphones. Please restart your computer with the headset plugged in to remedy this issue without addressing its underlying reasons.
2. Audio Conflict promoted by Maxx Audio PRO
If you’re using Waves MaxxAudio Pro software on a Dell machine, your issue is most likely caused by a software conflict between the generic Audio drivers and the set of specialized drivers that Maxx Audio Pro employs. To address this issue, open Maxx Audio Pro, turn on Maxx Audio, switch to a new headset, and then turn off Maxx Audio again.
3. Common Windows 11 inconsistency
You may resolve this problem without manual troubleshooting by running the ‘Playing Audio Troubleshooter’ and implementing the suggested repair. This procedure has been used successfully by many concerned users. It will resolve your issue if the problem is causing your headset to fail to connect, already addressed by a repair option contained in the troubleshooter.
4. Outdated audio driver
If you’re running a severely outdated audio driver transferred over from Windows 10, you’ll run into this problem (or older). If you are experiencing this problem, you may resolve it by using Device Manager to update your existing driver and replace it with a newer (completely compatible) version.
5. Corrupted audio driver
There are times when your current audio driver is corrupted and refuses to accept new device connections. Several people who are also experiencing this issue have stated that they were able to resolve it by removing the current driver and forcing Windows to revert to the generic audio driver. You can also read how to fix Audio Crackling issue.
6. Sound enhancements are enabled
If you’re having the same problem with numerous headsets and audio devices, it’s most likely because software upgrades are enabled. To fix Headphone Jack Not Recognized issue in the future, go to your sound settings and deactivate sound improvements for the affected headset.
7. Missing cumulative update
It turns out that Microsoft has already published a cumulative update that addresses this problem and assures that previously connected headsets may be reconnected without having to restart the computer. The hotfix contained in this cumulative update was published in March 2022, so if your Windows is up to date, you should already have it installed. If not, install all pending updates to ensure this patch takes effect.
8. System file corruption
In some instances, you may encounter this problem due to system file corruption that interferes with the connection of new playback audio devices. Several impacted individuals who were coping with this issue stated that they were able to resolve it by repairing or reinstalling their Windows 11 machines. You can also check how to Roll Back to Windows 10 From Windows 11.
How to Fix Headphone Jack Not Recognized in Windows 11
Now that you are aware of all of the potential reasons for this problem, here is a list of all of the solutions that people have tried to resolve this Windows 11 issue.
1. Reboot while the headset is connected
If you’re just getting started with troubleshooting, you should begin by restarting your PC while making sure the problematic headset is attached to your PC.
Keep in mind that Windows 11 works differently from Windows 10. For example, driver matching occurs just after the starting phase in Windows 11. (on Windows 10, this happens dynamically).
If you unplug your headset before plugging it back in, there will be no re-detection until you restart your computer.
So, if you haven’t already, connect the unrecognized headset to your PC before proceeding with the restart process. Then, wait until the next startup is finished to determine whether the issue has been resolved.
Update: It turns out that this behavior was not planned and will be fixed in a future Windows 11 update.
If your headset is still not recognized by Windows 11, follow the next procedure.
2. Override Maxx Audio PRO Settings
Suppose you’re running the Waves MaxxAudio Pro packages on a Dell machine. In that case, this is likely due to a software clash between the generic Audio drivers and the set of specialized counterparts used by Maxx Audio Pro.
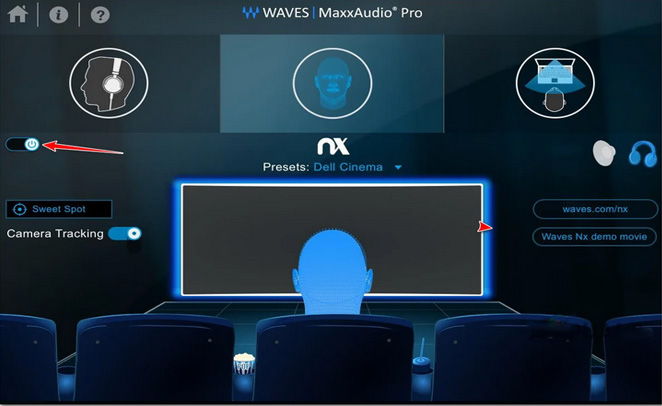
If such case applies to you and you don’t want to give up Maxx Audio Pro, the only solution that appears to have worked for many impacted users is to temporarily deactivate Max Audio before selecting your headset over headphones from the drop-down selection below. After that, you may deactivate MaxxAudio again and reboot your computer with confidence that the settings will be retained.
Follow the steps below for detailed advice on how to resolve the MaxxAudioPro-generated inconsistency:
- First and foremost, ensure that Maxx Audio Pro is open.
- Make sure the Max Audio toggle is turned on from the Max Audio Pro home screen.
- Once you’ve confirmed that the Maxx Audio function is activated, scroll below the equalization and choose the headset over headphones from the drop-down box.
- Finally, you may deactivate Maxx Audio and quit the program without fear of losing your settings.
If the Headphone Jack Not Recognized error is still not resolved, go to the next procedure listed below.
3. Run the ‘Playing Audio’ troubleshooter
If the first two techniques above do not resolve your problem, the next step is to run the ‘Playing Audio troubleshooter’ to apply the suggested remedy. This technique is easy to access and use and can be found in your computer’s Windows Settings.
The Playing Audio troubleshooter will examine the audio devices on your computer that you choose, looking for faults that may be stopping them from using the headset that you’re having difficulties connecting to Windows 11.
Note: This issue will most likely be effective in cases when the problem is caused by an underlying system file-related glitch.
If you haven’t already tried running the ‘Playing Audio’ troubleshooter and implementing the suggested remedy, do so now:
- To open Run dialogue box, press the Windows key + R.
- Next, type “ms-settings:troubleshoot,” and press Enter to open the Troubleshooting menu in the Settings app.
- In the Troubleshoot tab’s right-hand corner, choose Other Troubleshooters (under Options).
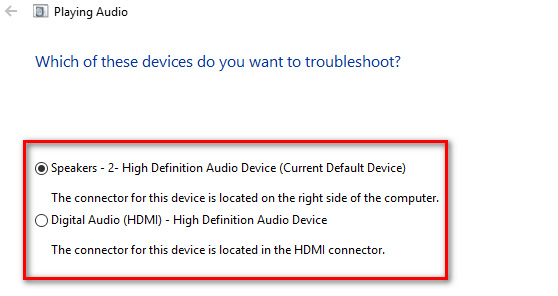
- Next, pick Most Frequent, and click the Run button next to the Playing Audio option.
- Be patient and wait till the preliminary examination is completed when you activate this troubleshooter.

- Next, set the currently active audio device as the default.
- Wait as the utility scans your Audio device for problems after starting this scan.
- If a issue is discovered, you will be advised how to resolve it.
- To comply with the on-screen instructions, click “Yes, Apply repair” or “Yes, Open *menu,” then follow the following on-screen steps.
- Please restart your computer when it has completed restarting to see whether the problem has been resolved.
If the Headphone Jack Not Recognized error issue is still not resolved, go to the next procedure listed below.
4. Update the audio driver
The next step is to ensure that the audio driver you’re currently using has been updated to the most recent version. If the troubleshooting procedure above did not assist, follow the next step. A Windows Update sub component should update and maintain this driver in most cases. There are situations, though, when an out-of-date audio driver incompatible with your current OS version renders you powerless. Many users claimed that the problem was eventually addressed when they used Device Manager to force the High Definition Audio Device’s Properties page to update the driver. If this case involves to you, take the steps below:
- Press the Windows key + R. After that, open Device Manager by entering “devmgmt.msc” and press Enter.
- Choose Yes if the User Account Control box prompts you to provide administrative access.
- Open the Sound, Video & Game Controllers drop-down menu after accessing Device Manager by going through the list of installed apps at the bottom of the screen.
- Right-click under the Sound, Video, and Game Controllers menu to choose your high-definition audio driver.
- Select Properties from the newly displayed context menu.
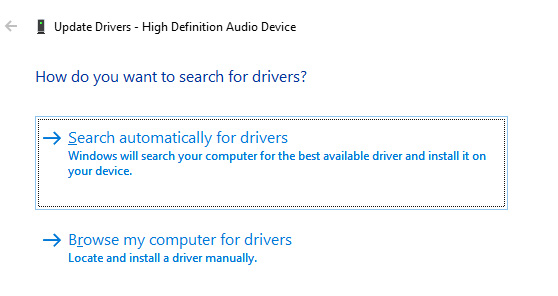
- Use the top menu on the Properties screen to pick Driver, then the Update Driver option.
- On the next step, choose Search automatically for drivers.
- Wait to see if a new audio driver version is discovered. If a new version is found, continue with the installation by following the on-screen instructions.
Note: If Device Manager cannot locate a new driver version, go to Windows Update and choose Search for updated drivers. This method is more effective in certain circumstances than a simple driver search in Device Manager. - If a new audio driver is installed, restart your computer and check whether the low audio problem is repaired the next time Windows 11 boots. If the issue persists, go on to the next solution listed below.
5. Disable software enhancements
If you’ve gone this far without discovering a suitable solution, the next area of research should be the Sound Enhancements you’ve most certainly activated. Many Windows 11 customers who had complained about being unable to connect their headsets stated that the issue was fixed after they disabled all software-powered audio improvements. When they disabled all audio enhancements, the issue was fixed, and they were able to connect their headset reliably (without having to reboot each time) The approach outlined below may altogether remove any Sound Properties upgrades.
IMPORTANT: If you use a specialized audio card, it will most likely have audio improvement options. Disabling them by the technical utility is advised since it would not solve the issue. Uncheck the option next to Audio Enhancement in the dedicated app if you’re running SRS Premium Sound or SRS Premium Sound. If you want further information, follow these steps:
- First, hit the Windows key + R to bring up the Run dialogue box.
- Type control to to open Control Panel.
- Search for Sound in the Control Panel using the search box in the top-right corner.
- On the next menu, choose Sound from the list of choices.
- When you get to the Sound screen, ensure the Playback tab is selected, then use your right mouse button to choose Properties from the context menu when you right-click on the problematic playback device.
- Go to Properties page of your default audio device, click the Enhancement tab in the horizontal menu, now check the box next to Disable all enhancements.
- In the end, click Apply to save the changes.
- Restart your computer and check whether the Headphone Jack Not Recognized error issue has been resolved following the restart.
If you’re still experiencing problems after disabling all software improvements, go to the next method given below.
6. Uninstall the latest audio driver manually and then reinstall it
If you’ve gotten this far without a feasible solution, you should start thinking about a possible problem caused by some form of corruption in the audio driver. This problem is common when upgrading from a previous version of Windows to Windows 11. Depending on how you upgraded, your earlier Windows version’s audio driver may have been moved over as well, rather than being replaced with an audio driver adapter for Windows 11.
In this case, you must use Device Manager to update your current audio driver in Windows 11. Since you tried upgrading your current driver, it didn’t work; you should delete it and see if your headset problems disappear.
Follow the steps outlined below:
- Press the Windows key + R to open the Run dialogue box.
- Next, enter “devmgmt.msc” into the text box and press Enter to open Device Manager.
- Click Yes if the User Account Control (UAC) window invites you to provide administrative access while using stricter UAC settings.
- After you’ve arrived at Device Manager, expand the Sound, video, and game controllers drop-down option by scrolling down the list of devices.
- Next, right-click on the broken headset and choose Uninstall device from the context menu.
- To complete the procedure, click Uninstall again on the confirmation screen.
- Once the audio driver has been removed, restart your computer and wait for the next startup to finish.
Note: This step will inform your operating system that the audio driver is missing and prompt you to install a generic driver equivalent.
If the Headphone Jack Not Recognized error issue is still not resolved, go to the next possible solution below.
7. Update Windows build
Remember that, as multiple users have confirmed, this problem was fixed mainly by Microsoft’s Windows update at the beginning of March 2022. According to a few Microsoft experts, if you have updated every cumulative Windows Update, you should no longer experience intermittent headset disconnections and difficulty pairing with certain headset kinds. To ensure this is applicable, go to the Windows Update component and manually check that you are running the most latest version of Windows 11. To install the most current Windows 11 updates, follow the instructions outlined below:
- Hit the Windows key + R to open the Run box.
- Enter “ms-settings:windowsupdate” into the newly displayed window, and press Enter to open the Windows Update tab of the Settings program.
Note: Depending on the UAC settings you previously established, you may see an account control prompt at this point. In this case, select Yes to provide admin access. - In the right-hand corner of the Windows Update window, click Check for Updates.
- If a new update is available, wait for it to download locally before clicking Install Now.
- Please remember that your computer may need rebooted before installing any outstanding updates. In this case, return to this page after the following booting procedure is complete.
- Restart your computer, then attempt to run the game displaying the error to see whether the problem has been resolved.
If your headset still doesn’t connect to your Windows 11 installation after you’ve confirmed that the most current version is installed, go to the last process below.
8. Perform a repair install or clean install
Assume that none of the previous methods provided in this article could assist you in resolving this issue. In such a situation, you should evaluate the possibility that your inability to connect your headset is due to broken sound connections.
Because numerous system files, in this case, fit the description of the culprit, the best course of action at this time is to replace every system file with a counterpart that you know is healthy and untouched by corruption.
There are two techniques you may use to do this:
Clean install – This is the way to go if you need a quick fix. The biggest downside of a clean installation of Windows is that, unless you have a backup of your data, the procedure will delete every personal file and program presently stored on the same drive as your operating system. It is because clean installation Windows allows you to change any system file without requiring appropriate installation discs.
Repair install – If you have the time, we recommend doing an in-place repair rather than a repair install. Although this approach is a bit more time-consuming and requires suitable Windows 11 installation DVDs, the critical advantage is that all your data, games, and apps are preserved.